Want to remove ads? Become a MK3OC Club Member today!

Saloon number 2

You gonna crimp your air con harness together :lol:

looks amazing! Gonna be a well specd car!
:lol: if it was 10year ago maybe.. yeah it will have AC and power windows, Electric Mirrors. I've got a EPas coloum to go in also eventually
 
Nice to see some progress on this mate :thumb:
 
Day off work today due to having new windows and doors fitted in the house. So spent some time on the car I managed to finally complete the AC loom. I added some waterproof plugs to the 2 Half's. Some loom tape later and the plastic over casing they looked factory. Il get some pics later on over the weekend :)
 
So yesterday wile I was off work I purchased the full exhaust system. Not cheap but I'm only gonna build the one. So 4 metres of 3" straight, 8x 45s a long resonator box and a long silencer box for the rear and a 6x4 oval tip. Made no delay and started mocking and tagging it in place luckily I had some pie cuts down the shed. More over the weekend hopefully the VBA ds and the Flexi arrive soon.IMG20220428182124.jpgIMG20220428181717.jpgIMG20220428181722.jpgIMG20220428192604.jpg
 
So been getting a few jobs ticked off the list over the bank holiday weekend, main plan was to get the underside finished but that never happened :( I ordered new Handbrake cables Wednesday with my local parts shop and they never ordered them nor did they have a fuel filter neither so I was pretty pi$$ed off. But never the less I did get my Brakes Bled off with the ATE brake bleeder from work. :) Then focused on building the exhaust that's a mission in itself on axle stands it's nearly there just need to finish the hardest part of the over axle piece then I can back purge and Tig the whole thing.
Got the Charge cooler pump mounted and tested the water circulation it flows really well and pretty quick. My main objective is to get it running this month. Then when June comes I can focus on Paint and interior. July I'd like to drive it before VBOA to iron out any faults :)IMG20220430170249.jpgIMG20220501170440.jpg
 

Attachments

  • IMG20220430170249.jpg
    IMG20220430170249.jpg
    720.4 KB · Views: 0
Looking good mate, Nice little project making your own exhaust
It's something I've always enjoyed doing, might make a jig for MK3 :)
 
So been pottering on. Ran out of argon do the exhaust will have to wait :( some things I haven't took pictures off. Mainly the redrilling of the Ph2 bonnet hinges to take the ph1 gsi bonnet.
Then I set to joining my Vectra B electric mirror looms into the astra door looms. Seen astho Dan got me a pair of Ph1 electric mirrors last year at VBOA.
Spoke with Dan And Cleg to compare pinouts and info on the wiring, but I also wrote down my pinouts of my door looms. Overall everything matched up colour for colour.IMG20220514082446.jpg

IMG20220513201140.jpgIMG20220514081940.jpg

Tried and tested tonight and they work :) also installed the rear illuminated grab handles and Illuminated Sun visors. Again they work with open and closing the door and when the doors closed they turn on with the rocker switch
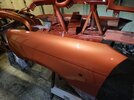
 

Attachments

  • IMG20220514082426.jpg
    IMG20220514082426.jpg
    301.1 KB · Views: 1
Few more bits done over the last couple nights after work and this weekend got the illuminated sunvisors fitted along with the illuminated rear grab handles.
Refitted the 2 door looms tested the mirrors chuffed they worked.

Today I've focused on the interior so took myself off shopping to Halfrauds for 2 rolls of Stinger Extreme sound deadening, roll of speaker cable. Got back and set too. Only planned to get my door cards back on but I went the extra mile. Put in my Hands free mic for the Headunit, the Window mount Aerial, and new Amp wiring kit wile all the plastics were off made sense to add it all in.

Got the rear doors done, deadening in, new door membrane sheet added, door cards on never to come back off. I HOPE!!! Finished off the remaining trim screws and seat belt anchor bolts.

Front doors to finish off and a bit of wiring in the car then that's interior completed. IMG20220521102300.jpgIMG20220521131956.jpgIMG20220521132006.jpgIMG20220521171742.jpgIMG20220521172542.jpg

Ohh and the engine Turned over off the key too no issue.. Exciting times to come :)
 
Big update I've been rather busy focused on the exterior as I had all parts just laid around taking up space. I figured it's best they were put back on the car. I took advantage of the 4day weekend to get panels prepared and primed . Over 10hrs in the bumper alone it was propper bad and so thick with paint !! Sanded it back must of took 8lays off :lol: IMG20220607191923.jpgIMG20220607191948.jpgIMG20220602180231.jpg
Wile I was on i trial fitted the panels back on. So fresh in primer. Plus wile I was on i repaired my Gsi arch liner as many will know I crashed the red saloon into a kerb and F*#ked it. So had a spare standard one and butchered it IMG20220607201243.jpgIMG20220608190418.jpg
 

Attachments

  • IMG20220610215814.jpg
    IMG20220610215814.jpg
    346.1 KB · Views: 2
  • IMG20220607191948.jpg
    IMG20220607191948.jpg
    475.7 KB · Views: 2
  • IMG20220607193835.jpg
    IMG20220607193835.jpg
    249.8 KB · Views: 2
  • IMG20220607193954.jpg
    IMG20220607193954.jpg
    236.5 KB · Views: 2
  • IMG20220607201243.jpg
    IMG20220607201243.jpg
    463 KB · Views: 2
Back on the bodywork and after the primer was cured and flatted back I got some colour on as of Friday night after work. Easy 3hrs spent painting and clear coating. IMG20220610203903.jpgIMG20220610215814.jpgIMG20220610215819.jpgIMG20220610215847.jpg
Saturday morning I set to building my bumper back up. Went and got new bolts for the splitter and the zinc coated acme screws in the Fogs. And I had Clegg come give me a hand So we got the boot on with Spoiler, mirrors, arch liners, wings on with all zinc bolts. Scruffed the interior out. Plenty still Todo but she will go to the ball (VBOA) :)IMG20220611143226.jpgIMG20220611105244.jpg
 
Looks mint in the flesh like.... soon as you get that radiator you'll be most of the way then:biggrin:
 
Nice work mate, I remember the build diary of when you painted the red one, looks a decent job on the paint :)
 
Nice work mate, I remember the build diary of when you painted the red one, looks a decent job on the paint :)
I do try :) red one was alright but that was just straight gloss finish 2K. but this one's base and clear.
 
Looks mint in the flesh like.... soon as you get that radiator you'll be most of the way then:biggrin:
Can't wait to get my radiator il be flying :)
 
Collected my sideskirt clips that I've had 3d printed. These have been a nightmare to get right. Original clips have a 10yr life silicone Flexi added to the plastic hence why they bend and take a beating when skirts are removed. I was lost off after the 4th attempt at making these clips straight up resin broke X3 So I give one of my skirts to the printer to push a clip on and pull it off multiple times. Finally found a solution 80% flexible resin with 20% ABS plastic. So I've had a full set of PH1 clips done. 42 clips in total. IMG20220612160025.jpg
Had to purchase the correct pins to fit the clips after been quoted 100+ for 84 pop rivet pins. I shopped around company called Bresco came up trump's for a pack of 90 at £69 deliveredIMG20220607193835.jpg
Now to carefully drill 84 holes :lol: I will be making a template for ph1 skirts on a 5door.
Made a start with the door moulds as I want to be able to remove the skirts at any point for sill maintenance so il be in these for some time In prep alone. I don't intend to blend the lower halfs in like they were on my red loon IMG20220612162330.jpgIMG20220531062553.jpgIMG20220531205625.jpg
Stay tuned for more on these but I don't have long
 
Progressing on with the sideskirts as they were well battered, and dropping to bits. But they lasted over 10yrs. So using my old doors as molds I cracked on and re profiled them as the plan is to be able to remove them if I ever need to. Not only that they use to scuff the sill mouldings and it done my head in having to touch them up all the time. Previously the end gaps were just filler so I decided to use a cutting of plastic from the old arch liner, glued and hot stapled and trimmed with a knife I had end covers :) repeated this on all 4. IMG20220612162330.jpg5ec134ab-9ad2-45d9-8301-847946223f8cphoto.jpegreceived_753855979082763.jpegreceived_767326114278283.jpeg

As you can see from the first picture they are in a bad shape at the bottom of the door, So Set away with a block and sand paper to straighten them up. Filled them up and blocked them back off by hand. In my mind I sed I wanted a small edge of door exposed so I know the mouldings will be clear of the Arch. I achieved what I wanted.
IMG20220616204020.jpgIMG20220616204038.jpg
IMG20220616204126.jpg

Little bit more work but they near ready for primer and paint. Then it's only the lower sill sections to finish.

Wile I was on I've put my bumper and grill on the car out the way to prevent any damages IMG20220618102354.jpg
 
Made a start fitting the skirt clips and pins as my previous car they were tiger sealed on.. but this car I want them on correct. So made myself a clear template (so I can use it for both front doors) marked the centre of the clips for the pins, after multiple double checking as I only get one go at this, I then transferred onto the car. Got the holes drilled, painted the holes to protect the bare metal and popped the pins in and slid the clips on. Had to try the moulding on and hey presto it fits perfect. Just another 70 holes to drill and 3 more templates to make. IMG20220621064534.jpgIMG20220621064727.jpg
P.S it's not fully fitted as they need paint.
 
Tonight after making a second template for the rear door, I got the door moulding pins and clips in place hung the panels on to get a idea of were they sit. And they bang on.. 40 odd more pins to go and il have the bottom halfs fitted :lol: IMG20220621194323.jpgIMG20220621203519.jpgIMG20220621201339.jpgIMG20220621201347.jpgIMG20220621201401.jpg
More to come soon
 

Users who are viewing this thread

Back
Top