As I said the handbrake gator was fiddly as it wasn't the exact size, just a smidge too large. The gear gator had elastic around the bottom & was the perfect size so could have been a simple pop it on the plastic cage & forget. However, me being me I wanted to do it properly so cut parts of the elastic away from the corners for a better fitment. Anyway here's the gator set I purchased click me.
-

VBOA National Rally Booking now Open
Want to remove ads? Become a MK3OC Club Member today!
You are using an out of date browser. It may not display this or other websites correctly.
You should upgrade or use an alternative browser.
You should upgrade or use an alternative browser.
Astra mk3 Arctic 3.0 V6 + F28 with Quaife
- Thread starter harvey
- Start date
Gave the mk3 a visual inspection the other month under the bonnet and noticed the l/h front Koni shocker was leaking from the top adjuster. Only a minor weep but required fixing nevertheless.

Removed both front legs and checked around the front arches with all looking good in there.


For anyone who left the first year at VBOA Market Harbour on the Monday these might bring back nightmares, I found them on the strut lower spring seats. They decided it would be a good idea to grit the road with boulders!

After enquiries a refurb for my existing pair of shocks was going to be just shy of £200, brand new replacements were around £240 or a completely free fix using my old spare GTE track day suspension. I opted for option C, a free fix. After stripping the mk3 suspension I found I had used Mk2 GTE 16v inserts Koni part no.86411068 Sport and my GTE kit was actually mk3 GSi Koni part no. 86101283 Sport.
Mk3 top and mk2 bottom.
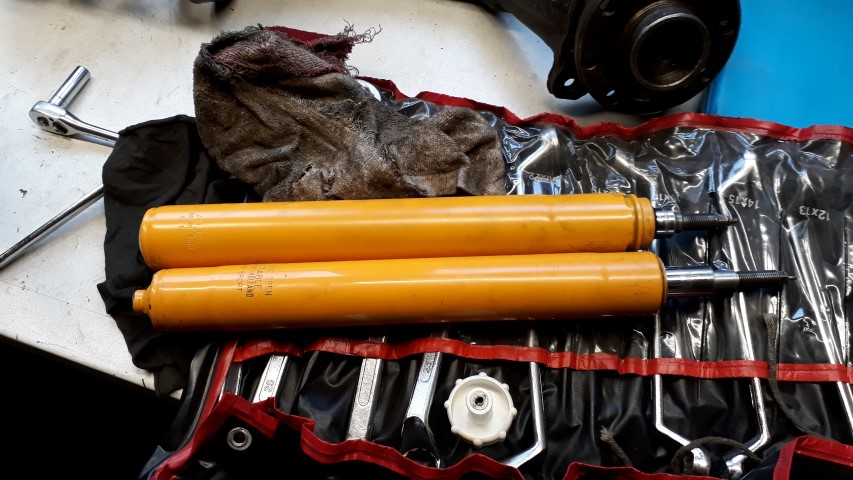
To run mk2 on the mk3 you just need to use a 5mm spacer under the nut as that’s all I had done and they have been fine until now.

Fresh mk3 inserts going in and manly stilsons to tighten the locking nut which should be 200Nm. I’ve had the locknut come loose previously on the mk3 so a blob of thread lock and good tug on the stilsons should put pay to that happening again.


Boshed the Cav mk3 V6 Eibach spring on, top gubbins and repeated for the other side. Leak resolved for no expense which is always a happy ending.

Once I’d got the struts refitted I routed the ABS and brake pad wear sensor wiring more neatly as I was never really happy how it looked previously. Much better this time.

Removed both front legs and checked around the front arches with all looking good in there.
For anyone who left the first year at VBOA Market Harbour on the Monday these might bring back nightmares, I found them on the strut lower spring seats. They decided it would be a good idea to grit the road with boulders!
After enquiries a refurb for my existing pair of shocks was going to be just shy of £200, brand new replacements were around £240 or a completely free fix using my old spare GTE track day suspension. I opted for option C, a free fix. After stripping the mk3 suspension I found I had used Mk2 GTE 16v inserts Koni part no.86411068 Sport and my GTE kit was actually mk3 GSi Koni part no. 86101283 Sport.
Mk3 top and mk2 bottom.
To run mk2 on the mk3 you just need to use a 5mm spacer under the nut as that’s all I had done and they have been fine until now.
Fresh mk3 inserts going in and manly stilsons to tighten the locking nut which should be 200Nm. I’ve had the locknut come loose previously on the mk3 so a blob of thread lock and good tug on the stilsons should put pay to that happening again.
Boshed the Cav mk3 V6 Eibach spring on, top gubbins and repeated for the other side. Leak resolved for no expense which is always a happy ending.
Once I’d got the struts refitted I routed the ABS and brake pad wear sensor wiring more neatly as I was never really happy how it looked previously. Much better this time.
Dug the Astra mk3 from its hibernation and gave it the once over in readiness for going back on the road next month.


Just to prove my custom made dash and the engine work I did a little vid. Can’t wait to actually drive it again as it’s been way too long, that is if I can get the keys off the wife as it is her car after all.
Just to prove my custom made dash and the engine work I did a little vid. Can’t wait to actually drive it again as it’s been way too long, that is if I can get the keys off the wife as it is her car after all.
Good work mate, great info about the dampers. Smart job with the abs sensor wiring too, I am missing the holder for the plug so now I have seen your, I know what im looking for in the pile of car parts lol
Finally, the mk3 is taxed and on the road now the weather has turned for the better, that was until it wasn’t last Sunday. Decided to pop into Derbyshire and the heavens opened but fear not it’s a car to use, until it isn’t and I found the front o/s brake caliper was sticking 
You see it does get used in the rain. This wet stuff is from the sky and not a hosepipe!

Lovely beading on the roof.

The V6 rear bank 1 lambda popped the EML on a couple of times so I’ve cleared the codes and not seen it since. Got a spare brand-new Bosch on the shelf just in case I need to swap it out.

On Monday evening the car resumed default position, on axle stands.

I removed and stripped both front calipers as there’s simply no point servicing just one for such a safety critical component. I had to use a punch through the brake line hole to get the piston out of the o/s caliper, it was tight. The n/s wasn’t so bad but was close to sticking.


Non-patented anti-drip braided line tool installed, old silicone sealer kept knowing it would come in handy one day for something.

Piston cleaned up well with no pitting.

Issue was the section between the inner and out seals had corroded even though the outer seal wasn’t damaged. I blame this on me assembling them last time using just brake fluid possibly causing it to dry out with moisture trapped, lesson learnt silicone grease assembly method only from here on.

Cleaned up the corrosion with my trusty Dremel and without seals in place the piston dropped in/out smoothly as it should.

Alfresco dining with a dirty mk3 anyone?

You see it does get used in the rain. This wet stuff is from the sky and not a hosepipe!
Lovely beading on the roof.
The V6 rear bank 1 lambda popped the EML on a couple of times so I’ve cleared the codes and not seen it since. Got a spare brand-new Bosch on the shelf just in case I need to swap it out.
On Monday evening the car resumed default position, on axle stands.
I removed and stripped both front calipers as there’s simply no point servicing just one for such a safety critical component. I had to use a punch through the brake line hole to get the piston out of the o/s caliper, it was tight. The n/s wasn’t so bad but was close to sticking.
Non-patented anti-drip braided line tool installed, old silicone sealer kept knowing it would come in handy one day for something.
Piston cleaned up well with no pitting.
Issue was the section between the inner and out seals had corroded even though the outer seal wasn’t damaged. I blame this on me assembling them last time using just brake fluid possibly causing it to dry out with moisture trapped, lesson learnt silicone grease assembly method only from here on.
Cleaned up the corrosion with my trusty Dremel and without seals in place the piston dropped in/out smoothly as it should.
Alfresco dining with a dirty mk3 anyone?
Last edited:
Seal kit ordered along with new banjo crush. Seal kit was from Brake Stop Lid and is excellent quality and comes with silicone piston seal assembly grease and red rubber grease for the caliper body sliders. Everything ordered Monday and arrived yesterday.

Assembly time using only the silicone grease for the seals and a good smearing around the now not rusty section. Inner wiper seal in place.

Outer weather seal stretched over the piston.

Weather seal located in the groove and gently but firmly pushed into place passed the inner seal before finally making sure the seal locates in the outer piston groove.


Refitted and bled the brakes using my wonderful assistant (the wife) as it was quicker than messing with Eezibleed.

Test drive success and car washed.

Then back to bed until next use.

Assembly time using only the silicone grease for the seals and a good smearing around the now not rusty section. Inner wiper seal in place.
Outer weather seal stretched over the piston.
Weather seal located in the groove and gently but firmly pushed into place passed the inner seal before finally making sure the seal locates in the outer piston groove.
Refitted and bled the brakes using my wonderful assistant (the wife) as it was quicker than messing with Eezibleed.
Test drive success and car washed.
Then back to bed until next use.
I’ve managed to acquire a couple of perfect mk3 top mount caps from a mate as my existing ones were drilled to accommodate the mk2 Koni top adjusters which are no longer fitted (leaking) having changed to the mk3 Koni.
Looks neater instead of having holes drilled unnecessarily.

Looks neater instead of having holes drilled unnecessarily.
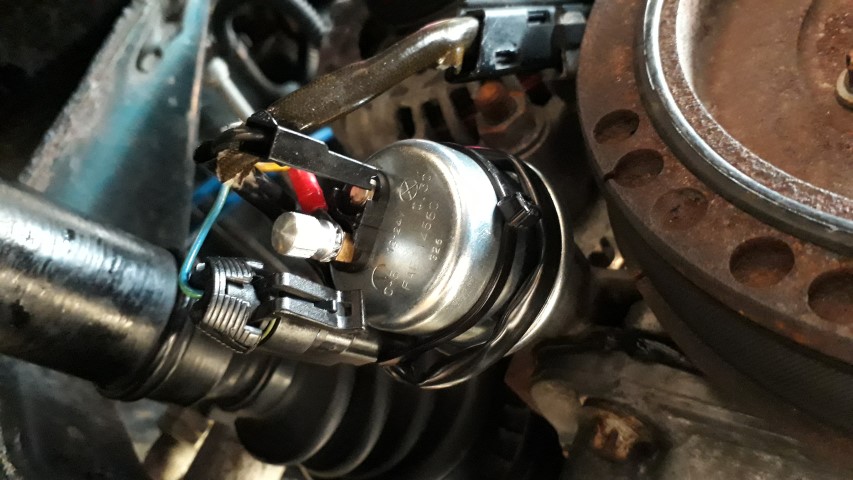
As the car is running my hybrid mk2/mk3 LCD dash I’ve finally got a fully working oil pressure gauge after messing with a few different sensors both new and used, all faulty for various reasons. In the end a brand new Intermotor 53850 sensor with adaptor loom so no cutting of the OE loom plug necessary works perfectly. The sensor offers 2x oil pressure feeds; 0-5 bar variable gauge, plus 0.30 bar oil warning light. Most Vauxhalls only come fitted with an oil warning light sensor and not the dual sensor that I have fitted for the LCD dash.
While on a fix it mission I had noted the ambient air temp was reading a tad high on the trip computer so rummaged through my spares stash and found three GM temp sensors. One being faulty so got binned and the other two working perfectly and giving a proper ambient temp. Turns out I was right as the originally was ready 5C high all the time, so also got binned.


While on a fix it mission I had noted the ambient air temp was reading a tad high on the trip computer so rummaged through my spares stash and found three GM temp sensors. One being faulty so got binned and the other two working perfectly and giving a proper ambient temp. Turns out I was right as the originally was ready 5C high all the time, so also got binned.
I thought it was about time I had the AC health checked on the mk3 as it was last done early 2017. It’s still working fine but didn’t seem to be as cold as it should be so I booked in with Stay Kool who are home based in the South Derby area. I arrived at my allotted time & Mark set about connecting his kit. We had a chat about the total gas weight & after double checking his documentation it was as I initially thought & should be 900g for the series 2 mk3. Pressure test passed & old gas removed it only had 360g left, no wonder it was cool & not cold. Re-gassed with dye added just in case any future leaks developed & I was on my way happy & cold in the knowledge the AC was in tip top condition.

Glad it's back on the road, this car is absolutely up there as my all time favs. Real nice work as ever ")
Gareth
Club Member
Lovely car this one is. Round up for vboa 2022 with this club
I found a crack in the intermediate drive shaft bearing support bracket last year and applied a temporary fix until I could source a replacement, more on that later. After a Sunday only attendance at VBOA the other week I obtained a bargain replacement within the depths of the trade stands for a whole £10, winning! Here it is with the support bracket removed.

I only required the alloy bracket but the drive shaft was decent & noted the bearings sounded dry. I thought to myself “I wonder?” then began pulling it apart to investigate.

Outer orange and inner black muck/dust seals removed.

Bearings found to be a perfect but dry condition.

Repacked with LM2 grease prior to reassembly.


The temporary fix on the left as the bolt wouldn’t tighten fully in the bracket thread and just span. You can see the crack in the bracket which was caused by the starter motor hitting as it attempted to make a break for freedom when the bolts worked loose, eek. Replacement on the right tested and full torque of 18Nm is achievable.

Part number for the alloy bracket is 90375925 which is used on Calibra/Cavalier C25XE/X25XE as well as Vectra B X25XE/Y26XE. Even the date stamp of 96 matched both brackets, spooky.

Replacement ready for fitting. Old bracket gone but keeping the old shaft as it makes a sturdy hitting stick. The 23mm spacers are due to the V6 being narrower than a 4 pot when using an F28 gearbox.

Jacked the Astra mk3 up from the drivers side and lost no gearbox fluid during the swap over. Pictured from underside looking up with rag on left to catch any drips but nothing came out.

While I was poking around, I fixed the rear end clunk that was occasionally heard on very bumper roads. Turned out to be the exhaust kissing the beam so a permanent fix was applied using a length of thick wall fuel hose slit down its length.

I only required the alloy bracket but the drive shaft was decent & noted the bearings sounded dry. I thought to myself “I wonder?” then began pulling it apart to investigate.
Outer orange and inner black muck/dust seals removed.
Bearings found to be a perfect but dry condition.
Repacked with LM2 grease prior to reassembly.
The temporary fix on the left as the bolt wouldn’t tighten fully in the bracket thread and just span. You can see the crack in the bracket which was caused by the starter motor hitting as it attempted to make a break for freedom when the bolts worked loose, eek. Replacement on the right tested and full torque of 18Nm is achievable.
Part number for the alloy bracket is 90375925 which is used on Calibra/Cavalier C25XE/X25XE as well as Vectra B X25XE/Y26XE. Even the date stamp of 96 matched both brackets, spooky.
Replacement ready for fitting. Old bracket gone but keeping the old shaft as it makes a sturdy hitting stick. The 23mm spacers are due to the V6 being narrower than a 4 pot when using an F28 gearbox.
Jacked the Astra mk3 up from the drivers side and lost no gearbox fluid during the swap over. Pictured from underside looking up with rag on left to catch any drips but nothing came out.
While I was poking around, I fixed the rear end clunk that was occasionally heard on very bumper roads. Turned out to be the exhaust kissing the beam so a permanent fix was applied using a length of thick wall fuel hose slit down its length.
Not really used the Astra mk3 V6 much of late so it got some fettling at the weekend. The cruise control has always been hit and miss but is an easy system so after double checking all my wiring the culprit was found. Dash righthand side stripped so I could get to the top of the fuse box and wire routing with the air vent assembly removed.

The issue being the main ignition 12v feed from the fuse box for the cruise control. The loom plug I installed had an intermittent contact, re-crimp and all sorted. Note to self, with the cc requiring a 10amp fused feed I tagged off fuse 6 I installed for the ABS.

Cleaning up the slam panel I caught one of the removal panel bolts and the paint flaked off, most annoying.

Bolt removed and keyed with sandpaper then etch primed.

Painted and lacquered.

Refitted after the lacquer had hardened, back to as it should look.

To say we were only going to keep it a couple more years after I had converted it the wife and I enjoy it way too much to let it go anytime soon. Took it for a blast yesterday into Derbyshire and both came back with a smile on our faces, need I say more. Yes, of course the cruise control works perfectly now I fixed my own issue

The issue being the main ignition 12v feed from the fuse box for the cruise control. The loom plug I installed had an intermittent contact, re-crimp and all sorted. Note to self, with the cc requiring a 10amp fused feed I tagged off fuse 6 I installed for the ABS.
Cleaning up the slam panel I caught one of the removal panel bolts and the paint flaked off, most annoying.
Bolt removed and keyed with sandpaper then etch primed.
Painted and lacquered.
Refitted after the lacquer had hardened, back to as it should look.
To say we were only going to keep it a couple more years after I had converted it the wife and I enjoy it way too much to let it go anytime soon. Took it for a blast yesterday into Derbyshire and both came back with a smile on our faces, need I say more. Yes, of course the cruise control works perfectly now I fixed my own issue
Great find on the drive shaft, bargain too.
I always enjoy reading your updates, the attention to detail is always fantastic
I always enjoy reading your updates, the attention to detail is always fantastic
Yearly vehicle health check, MOT in other words, was due for the Astra mk3 V6 last week so used by local favourite indy.

In she goes but alas my quality control skills failed me this year.

It failed on a r/h split ball joint boot which I had probably caused when I swapped the shocks earlier this year, sob sob boo hoo.

I also got an advisory on the l/h ball joint boot as it had started to deteriorate so me being me obviously took the decision to replace both sides.

Luckily, I’d got a pair of brand spanking new Febi ball joints part no. 05170 sitting on my shelf just in case as you never know get out of jail fit and forget spares, winning!

I suppose I could have sourced new rubber boots but I know Febi quality so ground off the rivets and bolted on the newbies.


It’s now got a fresh MOT pass having only covered 402 miles this year but it was an enjoyable experience thanks to the toned-down exhaust with all the little niggles having been ironed out. I’ve SORNed it and the Winter hibernation has begun having driven it back from the MOT re-check on fumes thanks to the current fuel crisis.
In she goes but alas my quality control skills failed me this year.
It failed on a r/h split ball joint boot which I had probably caused when I swapped the shocks earlier this year, sob sob boo hoo.
I also got an advisory on the l/h ball joint boot as it had started to deteriorate so me being me obviously took the decision to replace both sides.
Luckily, I’d got a pair of brand spanking new Febi ball joints part no. 05170 sitting on my shelf just in case as you never know get out of jail fit and forget spares, winning!
I suppose I could have sourced new rubber boots but I know Febi quality so ground off the rivets and bolted on the newbies.
It’s now got a fresh MOT pass having only covered 402 miles this year but it was an enjoyable experience thanks to the toned-down exhaust with all the little niggles having been ironed out. I’ve SORNed it and the Winter hibernation has begun having driven it back from the MOT re-check on fumes thanks to the current fuel crisis.
Yearly vehicle health check, MOT in other words, was due for the Astra mk3 V6 last week so used by local favourite indy.
In she goes but alas my quality control skills failed me this year.
It failed on a r/h split ball joint boot which I had probably caused when I swapped the shocks earlier this year, sob sob boo hoo.
I also got an advisory on the l/h ball joint boot as it had started to deteriorate so me being me obviously took the decision to replace both sides.
Luckily, I’d got a pair of brand spanking new Febi ball joints part no. 05170 sitting on my shelf just in case as you never know get out of jail fit and forget spares, winning!
I suppose I could have sourced new rubber boots but I know Febi quality so ground off the rivets and bolted on the newbies.
It’s now got a fresh MOT pass having only covered 402 miles this year but it was an enjoyable experience thanks to the toned-down exhaust with all the little niggles having been ironed out. I’ve SORNed it and the Winter hibernation has begun having driven it back from the MOT re-check on fumes thanks to the current fuel crisis.
So i'm gonna be super picky now, but why have you put the nuts at the top, that's just not normal lol. Bolts should always face downwards! stops the rust water collecting in the thread and sitting there and also if the nut falls off, the bolt sitting the other way up acts as a last line of defence before the ball joint falls off the arm lol
apart from that, top work, bolted ball joints are so much better, u can now just unbolt the balljoint off the arm and leave the balljoint in the hub and remove the whole leg, stops you destroying balljoint gaitors
Haha, I knew someone would comment. It's a rally thing as I've seen so many bolts damaged having been hit due to them poking through from the top down. Bottom up is the future, try it, you might like itSo i'm gonna be super picky now, but why have you put the nuts at the top, that's just not normal lol.

Users who are viewing this thread
Total: 2 (members: 0, guests: 2)