never does anything by half does he! That car just gets minter and minter
Want to remove ads? Become a MK3OC Club Member today!
You are using an out of date browser. It may not display this or other websites correctly.
You should upgrade or use an alternative browser.
You should upgrade or use an alternative browser.
- Status
- Not open for further replies.

put my attentions towards painting the subframe tonight!

stripped it all down

was just go down my normal route of petrol and a paint brush to clean it all up, but 15 years of oil leaks, road dirt and now a nice load of filler dust its pretty sludgy, lobbed it all in the back of me car to take it to work tomorrow for a good steam clean off, so will prob paint it tomorrow night!")
stripped it all down
was just go down my normal route of petrol and a paint brush to clean it all up, but 15 years of oil leaks, road dirt and now a nice load of filler dust its pretty sludgy, lobbed it all in the back of me car to take it to work tomorrow for a good steam clean off, so will prob paint it tomorrow night!
hi,is taking the subframe off an engine out job?? got me pondering if i could do it to mine?
you'd have to suspend the engine as the rear mount is boulted to the subframe, and you'd have to take the exhaust off to, other than that i cant see why not!
gave the subframe a good steam clean at work today and got all the gunk off, came up pretty well

but obviously not clean enough for me, so out came the paint again, heres the underneith done

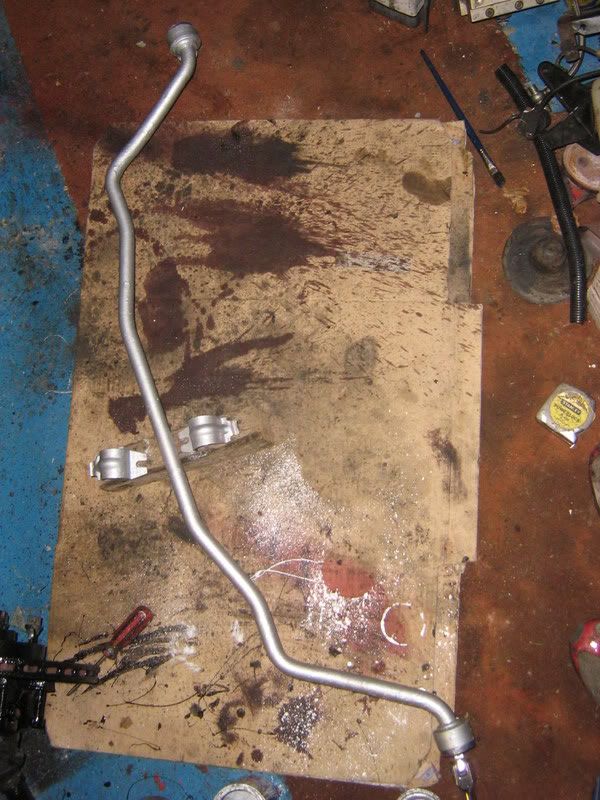
and the top, and the anti roll bar

got one of the struts out for a clean up

painted up, much better")

will carry on the other side tomorrow night probs!
but obviously not clean enough for me, so out came the paint again, heres the underneith done
and the top, and the anti roll bar
got one of the struts out for a clean up
painted up, much better
will carry on the other side tomorrow night probs!
fair play rc it's really coming on now.
Should get equal length shaft Ron. Will make a noticeable difference!
bit more painting tonight, did the other side leg and shaft

and gave the anti roll bar another coat of silver
and gave the gearbox a coat to brighten it up while i had the silver out!

and gave the anti roll bar another coat of silver
and gave the gearbox a coat to brighten it up while i had the silver out!
certainly dont do things by halfs do you mate this is going to be one nice gsi when its finished to say the least..
ill have to come see it in the flesh one sat night down in south end still waiting for some free time to get down there.
ill have to come see it in the flesh one sat night down in south end still waiting for some free time to get down there.
very nice m8.what wheels are they and what size
Techno detroit F1s in 18s i believe
Techno detroit F1s in 18s i believe
and the winner is..... dan!
correct

Easily one of the best looking wheels for mk3's imo 
got the o/s engine bay finished tonight, took a few more fills as it wasnt quite right


primed it up in 1k primer again for now


and the other sides all done now too


ready for a nice few coats of 2k primer, was gonna go it tomorrow, but forgot to bring the gun home from work
while i was sitting in the engine bay admiring my work i started thinking bout the looms, the head light loom in paticular. i knew if i left it standard along the inner wing it would bug me every time i opened the bonnet, and had the abs loom to get rid of that side.

so decided i'm going to run the loom under neith the chassis leg in the wheelarch.
also to do with the headlights i remembered it had had a over ride repair a few years ago, found a receipt from about 1998 saying head light bulb warning unit in glove box by passed, and didnt know what this was, untill it snowed at the begining of the year, and the day in which the snow melted the headlights came on and flattened the battery, and every time i put the batt on charge the lights were on, so investigated around, took ogg the scuttle pannel and foung 4 pelays rapped up in some rubber gloves and cellotape, traced the wires and the four relays were for left dip beam, left main beam, right dip beam and right main bream, and the snow had melted and filled them up with water as they were in a 9 year old rubber glove!
so renewed all the relays and i made up a box to keep them dry back then


theres alot of wires in this loom, head lights main and dipped both sides, side lights both sides, fog lights both sides, head light adjusters, horns, and all the wired for the rad and, and the huge abs unit loom too, so it was a case of get the haynes manual wiring diagrams out and trace all the colours.
got rid of the abs loom, checked there was noting else needed in it, and got rid of the radiator fan loom as running kenlow fans with a seperate loom, then seperated all the different lights out and all the earths to one sode, i'll earth each light by the units themselfs


bit more weight saving, got rid of some more spare wires lol

and planning to run the looms int the wheel arches and come up these holes, cut to size to the plugs in the lights.

thats todays work done, gonna start makin up the new looms tomorrow proberly
primed it up in 1k primer again for now
and the other sides all done now too
ready for a nice few coats of 2k primer, was gonna go it tomorrow, but forgot to bring the gun home from work
while i was sitting in the engine bay admiring my work i started thinking bout the looms, the head light loom in paticular. i knew if i left it standard along the inner wing it would bug me every time i opened the bonnet, and had the abs loom to get rid of that side.
so decided i'm going to run the loom under neith the chassis leg in the wheelarch.
also to do with the headlights i remembered it had had a over ride repair a few years ago, found a receipt from about 1998 saying head light bulb warning unit in glove box by passed, and didnt know what this was, untill it snowed at the begining of the year, and the day in which the snow melted the headlights came on and flattened the battery, and every time i put the batt on charge the lights were on, so investigated around, took ogg the scuttle pannel and foung 4 pelays rapped up in some rubber gloves and cellotape, traced the wires and the four relays were for left dip beam, left main beam, right dip beam and right main bream, and the snow had melted and filled them up with water as they were in a 9 year old rubber glove!
so renewed all the relays and i made up a box to keep them dry back then
theres alot of wires in this loom, head lights main and dipped both sides, side lights both sides, fog lights both sides, head light adjusters, horns, and all the wired for the rad and, and the huge abs unit loom too, so it was a case of get the haynes manual wiring diagrams out and trace all the colours.
got rid of the abs loom, checked there was noting else needed in it, and got rid of the radiator fan loom as running kenlow fans with a seperate loom, then seperated all the different lights out and all the earths to one sode, i'll earth each light by the units themselfs
bit more weight saving, got rid of some more spare wires lol
and planning to run the looms int the wheel arches and come up these holes, cut to size to the plugs in the lights.
thats todays work done, gonna start makin up the new looms tomorrow proberly
Ive got all this to come lol
Your doing most things i had planned to do!
Your doing most things i had planned to do!
Ive got all this to come lol
Your doing most things i had planned to do!
cant accuse me of copying as you seem to keep EVERYTHING a secret


put the anti roll bar back on the subframe this morining! nice and shiney

then started stripping all the tape off the loom to see what i had at the begining

and took the glovebox out and removed some sound deading to see what i had the other side

and also took the side panel out too, and found the most probable reason why the abs has never been working on the car..... no ecu

so did some measureing and found where i could rin the loom through , ideally i'd just go straight through the fire wall, but the head light squirter bottle sits there so couldnt, so went up instead

new hole

to get those relay's out i had to cut the loom so coloured up the matching wires

and threaded all the loom into the ****pit then out through it new hole into the bay

i re made all the looms for the head light realys, i was just going to extend it, but the wires they'd used all looked a bit on the small side for my liking, so re did it all again

and soldiered it all back in place, as apose to all the connectors that had been used before

started taping it all up, got some proper loom tape at work to finish it off so will get that tomorrow

and where it all will run now (will be taking the amp wire out of there too)

and into the wheel arch

then started stripping all the tape off the loom to see what i had at the begining
and took the glovebox out and removed some sound deading to see what i had the other side
and also took the side panel out too, and found the most probable reason why the abs has never been working on the car..... no ecu
so did some measureing and found where i could rin the loom through , ideally i'd just go straight through the fire wall, but the head light squirter bottle sits there so couldnt, so went up instead
new hole
to get those relay's out i had to cut the loom so coloured up the matching wires
and threaded all the loom into the ****pit then out through it new hole into the bay
i re made all the looms for the head light realys, i was just going to extend it, but the wires they'd used all looked a bit on the small side for my liking, so re did it all again
and soldiered it all back in place, as apose to all the connectors that had been used before
started taping it all up, got some proper loom tape at work to finish it off so will get that tomorrow
and where it all will run now (will be taking the amp wire out of there too)
and into the wheel arch
I take it your battery's going in the boot? obviously making it easier to power the stereo stuff. So you going to plate those other holes aswell?
yep battrys shifting to the boot purely for the purpose of getting it out of the engine bay, not too worried bout stereo stuff in the boot really, not really my kinda thing, i just like goin fast, yea will be getting rid of the holes!
- Status
- Not open for further replies.
Users who are viewing this thread
Total: 7 (members: 0, guests: 7)